Showing posts with label Nails. Show all posts

Thursday, July 3, 2014

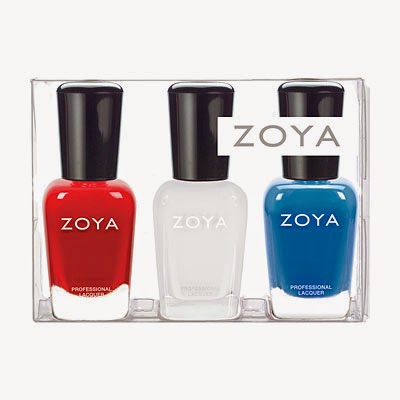
Celebrate the 4th with Free Nail Polish from Zoya


To celebrate the 4th of July, Zoya is offering a limited time promotion where you can pick any three shades that you want for FREE! That's right, free! All you have to do is chip in $12 for shipping and processing and they'll send you your favorite colors of toxin free nail polish your way. Just hop onto zoya.com and follow the steps below. Offer valid NOW - 7/6/14 (11:59pm EST).  I've participated in previous promotions from Zoya and note that shipping takes a rather long time, but guess you can't really complain for getting polishes for practically free. Zoya polishes normally retail for $9 a pop plus shipping.

Use Code: THREEDOM

How it works:
1. Add at least three (3) Zoya Nail Polish shades to your shopping cart, along with any additional items you wish to purchase.

2. Enter Code THREEDOM into the coupon code field in cart and press "Apply Code".

3. Complete check-out, review and submit order.
Or if you're feeling patriotic, check out their limited edition star spangled trios in variations of good old red, white and blue for $15 a pop with free shipping.

Saturday, January 12, 2013

Free Zoya Nail Polish!

Sorry about the late add but I just stumbled upon this deal today. The nail polish normally costs $8 a pop but now you can snag it for the cost of shipping and handling - $10. I actually snagged this deal last year and I will warn you that shipping is INCREDIBLY SLOW. So order, forget about it and be pleasantly surprised in about a month's time. Head to Zoya.comhttp://www.zoya.com/ before midnight tomorrow and enter code ZOYA2013 at checkout.

Wednesday, September 26, 2012

DIY Polka Dot Nails


Polka Dot Nails are an easy fun way to bring some whimsy and attitude to your nails. You don't need an expensive dotting tool, all you need is a pin and a piece of paper.

First choose 2 contrasting shades of nail polish, one for the base and one for the dot.  After applying base coat, apply 2 coats of the color for the base.

Place a little dot of the contrast color nail polish on a piece of paper (I tend to use an old piece of mail or a business card I don't need anymore). Carefully dipping the end of your pin into the contrast shade place dots on your nail as desired.  If the contrast nail polish starts getting too thick, you can just place a new dot and continue for both hands.

Once nail polish has set, finish off with a clear top coat.  Voila - polka dot nails to take you on your way.

Tuesday, July 24, 2012

Nail Art Fun with CND Shellac

Erin and I have written about CND quite in a bit in the past, so by now you're probably familiar with the long lasting Power Polish manicures.  I recently had the pleasure of attending CND Shellac SpaSanctunary and preview event, where I got to check out the new fall colors and learn about all the fun nail art that can be done with Shellac.

My favorites from the fall collection - Midnight Swim, Sugared Spice & Vexed Violette.

CND (Creative Nail Design) is a professional nail polish and a partner for many runway shows like The Blonds, Nicole Miller, Behnaz Sarafpour, and Rachel Antonoff.

CND nails at Rachel Antonoff Fall 2012

Wednesday, July 4, 2012

Nail Artist: AstroWifey

Photo courtesy of AstroWifey

Last week I was in the Dominican Republic for a wedding.  The Sunday before my trip, I ventured to Jefferson Park to visit manicurist and nail artist AstroWifey for festive "no chip" manicure.


I came to AstroWifey with a few ideas in mind, and I could not be more pleased with how she brought the "his & her" theme to life.  It may be a bit hard to tell from these pictures, but she even drew different style eyeglasses.  Yes, she hand painted each of those designs!  Amazing right?


This manicure has been one of the best manicures of my life.  It's been 10 days and I literally have just one chip, and this is after a hell of a lot of activity - traveling, carrying DJ equipment, swimming, playing in sand, zip lining, horseback riding, and biking.  AstroWifey uses CND Shellac.  You may remember Erin's writeup about it awhile back.  The shine really does hold up!  And CND has some new powders, so your manicurist can custom make colors like this bright orange by AstroWifey.

I had such a great experience and her prices are very reasonable.  I highly recommend it!  It can be a bit of a trek from the east side, but if you live off the blue line, it's actually super easy to get there.  To view her price list and book an appointment, visit her page on StyleSeat.

Wednesday, November 16, 2011

CND Shellac–18 Days of Near Flawless Nails

I first tried CND Shellac last year and loved the long lasting, super shiny formula that was ready to go the instant it's completed with no additional dry time required upon exiting the UV lamp.  I had a chance to get a complimentary manicure at a press event recently and was loving all the new colors that had been introduced.  During my first round there were only 12 colors in predominantly classic shades.  The collection now consists of 30 colors and is available in new fashion forward shades.  With the ability to layer and build color through layering the color possibilities are are endless. Shellac is 3-Free with no formaldehyde, toluene or DBP.

BREAKOUT ROOMSI previously tried the super sophisticated and deep color Fedora.  This time around, I decided to have fun by layering 2 layers of the pearlescent mermaid green tone Hotski to Tchotchke with 1 layer of the subtle holographic glitter shade Mother of Pearl.

IMAG3774IMAG3773

The photos speak for themselves, can you believe my nails were done 18 days ago? Aside from minor chopping on my right index finger and ever so slight edge wear you can only tell by how far my nail has grown from the nail bed in 2.5 weeks.  Perhaps because it is a lighter color and pearlescent instead of matter there are no signs of even surface scratches or dulling.  I even was painting furniture and I found a leaky bottle of nail polish during this time that I had to clean up during this time.  Nothing except time ruined my polish.

After spending the weekend out of town, I need to hit up a salon to get the polish removed using special nail wraps.

Shellac manicures are great if you don’t have time to do your nails often and want to get the maximum look for minimal salon effort.  It’s also great if you’re headed on vacation and won’t have access to a salon.  Use the Salon Locator to find a Salon near you.

Monday, November 7, 2011

Buy: NCLA Nail Polish

IMAG3264

Last month I had a chance to try out and review NCLA nail wraps.  With the fashion forward designs that are easy to use and don’t dry out, NCLA nail wraps are an easy affordable way to make a big statement.

As of today, NCLA is expanding into a brand new nail polish that not only features amazing colors but are guaranteed to be 5 Free - No harmful carcinogens such as DBP, Toluene, Formaldehyde or Camphor. Plus nothing is tested on animals!  Way to go  NCLA for raising the bar in health while still pumping out beautiful colors in super cute and clean looking rectangular bottles.

The colors are all inspired by all things LA and I have to admit that I was completely enamored by pretty much the entire collection.  From the bright purple to Pick me Up at Melrose Place to the bronze tone Bel Air Trophy Wife to the serene blue of Santa Monica Shore Thing I was hooked.  Also for an unexpected modern color - light grey concrete Downtown Dollface is pretty perfect.  I also loved Hollywood Hills Hot Number’s chunky glitter look that will add plenty of fun-fetti over any color or a bold statement after several coats on it’s own.NCLACOLOURS

Each bottle will be retailing for $16 a pop at select fine retailers.  Check out ShopNCLA.com for more info.

Monday, October 31, 2011

Product Review: Nails Inc. Magnetic Nail Polish

IMAG3269IMAG3272

I first read about magnetic nail polish a few months ago and have been wanting to try it ever since but never bothered importing it from the UK.  Fortunately Sephora recently started carrying Nails Inc Magnetic Polish in 2 different colors.  My roommate recently picked up the purple toned Houses of Parliament and soon our entire apartment had excitedly applied the polish.

IMAG3274

Wednesday, October 12, 2011

Product Review: NCLA Nail Wraps

As you may have already figured out I am something of a nail polish fanatic - I have been known to at time freak people out because I recognize the OPI color name.  Truthfully though my nails go from deplorable where I try to hide them for weeks to well manicured.

So when I was offered the chance* to try out one of NCLA, Nail Couture LA, nail wraps I couldn't turn it down.  I have previously tried Sally Hansen peel and stick nail polish and wondered how it would differ.

IMAG3021IMAG3022For one thing there are a greater variety of designs especially those featuring more intricate design and a more sophisticated sense of color. I tried a digital looking design called Mission to Mars from the Boogie Nights collection.

IMAG3025IMAG3038With the Sally Hansen, you have to use up all the designs once you open a packet or else they dry out. NCLA nails will keep for future use if kept in an airtight container.  NCLA nails require a coat of clear polish beforehand to allow the polish to adhere.  NCLA nails are slightly easier to apply because you simply peel and stick instead of snapping and peeling off an additional layer of protective film.  They both require the application of clear nail polish after to seal in the polish.

My nails were completed super fast and they looked good with the exception of my index finger that I had to redo.  Perhaps it was my inexperience but I managed to get a couple air bubbles that I couldn't smooth out nicely.  I think if I had liberally applied more base coat from the get go it might have adhered better.

IMAG3064

Over the next few days I got plenty of compliments.  My one complaint is that the edges after doing some of my typical everyday things started to get jagged and rough feeling.  Upon reading additional instructions I learned that for perfect edges, NCLA recommends trimming your nails with a clipper.  I tried this on a few nails and it definitely helped.  Perhaps my next time I try this out I’ll trim and file my nails after applying the wraps.

IMAG3074

By the time day 7 rolled around they still looked pretty good and could have stayed on for another couple days but I was in the mood to try something new with my nails and although I probably shouldn’t I peeled the wraps off fairly easily in a few big swoops.

While each design of nail wrap costs about $16 you get enough wraps to do your hands about 4 times.  So at $4 a pop that will last you more than a week it’s really quite affordable. If you were ambitious I’m sure you could trim them down to fit toes and do nails & toes together 2 times.

*full disclosure: I received 1 complimentary wrap design to test

Thursday, September 29, 2011

Now Wearing...

Hi, it's me Lani. Sorry for the radio silence. I've been on a bit of a whirlwind. The short story is I moved to Chicago to start a new job and new chapter in my life; the full story and a proper outfit post to come when I have proper internet access. I'm currently bootlegging a very weak signal from the corner of my apartment.

Landscape print coat - Timo Weiland
Collared shirt - Neurotica (London)
Rings - Forever 21
Snakeskin bag - Botkier
With no internet, no TV or even no turntables to unwind after work, I decided to attempt ombre nails with teal and black polish. For someone like Erin, this is super easy (exhibit A, ombre nails in 2008 & exhibit B, leopard nails in 2009). For someone like me who usually struggles to paint within the lines, the results are pretty astonishing.
One finger at a time, I started with small globs of black polish on the bottom and used my teal polish to smooth it out. And applying a topcoat helped blend the colors together. I'll admit that I got quite a bit of polish on the sides, but I was able to rub most of it off in the shower. It's really quite easy, so I don't have any real tips other than keeping a piece of paper handy for wiping off the brush to your lighter polish.

I will have proper internet next week, so I'll be sharing photos from Chicago soon!

Monday, December 20, 2010

CND Shellac Nail Polish Review

I had the chance to try out Creative Nail Design’s Shellac nail polish (compliments of CND) a few weeks ago while I was at a clothing preview event.  I had never heard of Shellac before and was really excited to try a nail polish that claimed to stay put for up to 14 days! I can barely get a manicure to last 7 sometimes because I’m pretty hard on my nails between working in fashion, cooking for myself and just being a general klutz.  Shellac is sort of a nail polish/gel hybrid.  It looks like regular nail polish and is painted on your nails like usual.  The only difference is that you stick your hand in a UV lamp in between coats.  I had a hard time choosing which shade to try out but in the end the beautiful deep Fedora color called out to me.

First thing I notice was how quickly the polish was dry and how glossy it was. It was like I had a mirror finish on my nails.  Unlike regular polish it wasn’t only surface dried but it was fully cured and ready to go.  I could sort through racks of clothing without fear from the instant I came out of the UV lamp.  It was my first manicure at a preview that I’ve gotten without smearing a couple nails before heading home.Day 1 –  After a day where I’ve been fairly rough with my nails they are perfectly intact. Typing, texting, using pins for a fitting, cooking, the list goes on. No signs of edge wear.  For a moment I think I spot a dull spot and realize it’s not a surface scratch but the manicurist missed a spot of residue when she was doing my nails and it easily rubs off with a few swipes of the pad of my finger.  My fingers look like deep richly colored little mirrors.

Day 2-5 – Seriously hardcore finish.  Glossy as Day 1, still looks pretty much perfect on the left hand, while the right hand is showing minimal edge wear at the tips of 2 nails that is so minimal (it’s about the width of a strand of hair/less) that you wouldn’t notice unless you were really staring for a problem.

By Day 6-7 my nails are glossy as ever but a closer examination will reveal minor surface scratches.  The minimal edge wear is on 2 fingers on my left hand and 3 on my right on my most used fingers (the thumb, the pointer & the middle finger).

Day 8-9 – Still shiny for most part but due to surface wear there are some slight dull patches that are only discernable with intense staring at a distance of about  6 inches.  The tip wear has extended from only a hair deep to about ½  a mm on certain parts of nails.  Nails are really starting to grow out so there is a 1 mm gap at my nail bed.  My ring finger, pinky and surprisingly my thumb are by far the most pristine, with hardly any edge wear and no dull surface scratch spots.  Not too shabby for over a week of hard use.  From less than 2 feet away my friend comments that my nails look freshly painted from the nail salon.  (On a side note my Sephora shipment came today and I’m itching to try my new nail polishes I ordered…but I must endure)Day 10 –While I was out at dinner my nail caught the edge of something and the first signs of truly noticeable damage occurs.  It’s funny because I complained about my nail chipping to a guy friend and he actually commented that he had thought that I just got my nails done.

Day 11 – The damage on my left middle finger increases a bit. The nail polish seems very flexible like a sheet and once the seal is broken it just sort of seems to want to give way.  My right hand however still looks pretty darn good. Day 12-13- There is very minimal change from Day 11.  On Day 13, there is a slight chipping of the middle finger by the cuticle but otherwise very little change.Day 14 – I think I was working with my hands on a broken piece of jewelry and I managed to dent up the polish in my right index finger and thumb a bit.  While the nails are still generally glossy I think  that I’ve trashed them to a point of time for removal.

Day 15 – I know that you are really supposed to use special cuticle wraps in acetone to remove this polish.  However, I just started picking at them while I was sitting and realized that Shellac’s strength is it’s flexibility that allows it to sort of stick together and come off in sheets.  I ended up peeling off all the nail polish off my fingers in a matter of minutes sans acetone.

Overall, I really enjoyed my Shellac Manicure.  I loved how shiny it stayed even til the very end.  I did however after the 10 day point get a bit color stir-crazy but I really think that if you have a busy lifestyle or want to ensure great nails while you are on a vacation, Shellac would be the perfect answer.  While it does cost a bit more than a traditional manicure, it makes up for it in staying power.

Shellac is available in 12 fashion colors but requires a trip to the salon as it needs the special UV lamps to cure the color.  To locate a salon near you click here.

Wednesday, September 23, 2009

Nail Polish Review: OPI Suede Collection


The OPI Suede collection hit stores earlier this month but I finally had a chance to check them out in real life. You might remember me mentioning the growing trend towards Matte Finish nail polish earlier this year. And sure enough OPI did come out with some Matte Finish shades but it was Essie, not OPI that released the Matte About You finisher that takes your regular nail polish into Flat Shades! I still need to pick up a bottle but didn't spot it at Ricky's today.

Anyways OPI launched 6 shades of their best selling colors in a Matte Collection, but after testing it out, I wasn't sure I loved the completely Flat Chalky finish! Fortunately if you want the Matte look with just a little bit of shimmer texture effects, OPI also launched 6 best selling shades as part of the Suede collection including colors: You Don’t Know Jacques, Russian Navy, Lincoln Park, OPI Ink , We’ll Always Have Paris, Suzi Skies In The Pyrenees.

I wondered if I should get the shade You Don't Know Jacques (the infamous greyish brown shade of last F'08) but it looked more golden toned than grey so I gravitated towards getting the We'll Always Have Paris Suede. It's a great purplish/pink that reminds me of Jem and the Holograms that I'm sure will be perfect for fall. What do you think of the color?

The polish goes on smooth and actually dries super quickly. It took 2 or 3 coats to get even coverage, but is actually faster to do than regular nail polish as there is hardly any lag time between coats. The nail polish came with a warning tag that noted it will not wear as long as original OPI Lacquer that I can usually make last for a week. It also says not to use top coat or use hand lotion. I understood the top coat part and even tested it on my pinky nail. It actually makes the color look more like regular opalescent nail polish and takes away the matte finish. But it was the warning about lotion that freaked me out because as the weather gets colder, the more I need lotion. I tested out 2 hand creams subsequently and did not notice any adverse effects to the finish, so I think it should be fine to use lotion.

Overall I really like it as it feels almost like quick dry and I am in love with the matte textured look. We'll see how well it holds up to regular wear and tear though as the week progresses.
Related Posts Plugin for WordPress, Blogger...